The Driving Companion
Unit 2: Task 11 - The 3-point turn

Learning Outcome
- The learner will be able to select a safe and suitable location to perform the 3-point turn; and
- The learner will be able to turn the vehicle around safely and competently within the boundaries of a carriageway that is narrower than the turning circle of the vehicle while maintaining full control of the vehicle.
Assessment Standard
The learner will accurately perform parts 1and 2 of this task together without assistance.
The assessment will be a demonstration on at least two consecutive but separate occasions.
Requirements
Selecting a location for the 3-point turn
- Select a suitable, safe and legal place at the kerb to stop;
- Check the centre mirror, then the left mirror (for bicycle riders etc.) and signal left;
- Ensure that there are no obstructions next to the kerb forward of the centre of the vehicle on the left (reversing area);
- Smoothly slow the vehicle (to just above engine idle speed) using the footbrake operated by the right foot.
- (For manuals) push the clutch down just before reaching engine idle speed to prevent stalling while maintaining light pressure on the footbrake;
- Bring the vehicle to a smooth stop without jerking the vehicle;
- Check that the vehicle has stopped;
- if preparing to immediately commence the 3-point turn, ensure the correct gear has been selected in preparation to move off (apply park brake if required);
OR
If intending to fully secure the vehicle, apply the park brake and select neutral (manuals) park (automatics) and release the brake pedal and then (for manuals) release the clutch; - Perform all steps 1 to 8 in sequence;
- Cancel any signal after stopping.
The 3-Point turn (U-turn including reversing)
- Check the centre mirror, then the right mirror, then signal right for at least 5 seconds;
- (If moving off from fully secured) Push clutch pedal down (manuals) / right foot on brake pedal (automatics) select first gear (manuals) / select 'drive' (automatics);
- Apply appropriate power, (and for manuals) clutch to 'friction point';
- Check the centre mirror again, then the right mirror, then over the right shoulder (blind spot check) for traffic (from driveways, roads opposite or U-turning traffic);
- If safe, look forwards (release the park brake as required);
- Accelerate smoothly away from the kerb without stalling or rolling back while turning the steering wheel to the right (while not prohibited dry/stationary steering is not encouraged) until on full lock (if required) and cancel the signal;
- About 1 metre from the right kerb whilst keeping the vehicle moving turn the steering wheel sufficiently to the left (while not prohibited dry/stationary steering is not encouraged);
- Stop before touching the kerb;
- Select reverse gear, apply the park brake if required (holding the button in - optional) and check both directions and behind (over shoulders);
- Move off in reverse without rolling or stalling (continue steering left as required), under full control and continue checking in all directions (moving head and eyes) whilst reversing;
- About 1 metre from the kerb whilst keeping the vehicle moving steer sufficiently to the right (while not prohibited dry/stationary steering is not encouraged) and prepare to move off down the road;
- Stop before touching the kerb;
- Select first gear* or 'Drive'**, apply the handbrake if required (holding the button in - optional) and check both ways for traffic;
- When safe, move off down the road maintaining full control of the vehicle without over-steering (Aim high in steering); and
- (b) Perform all steps 1 to 14 in sequence.
*MANUAL **AUTOMATICS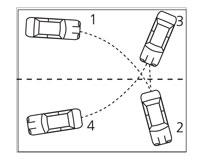
61


